
How to Go Paperless: A Step-by-Step Plan for Your Home Office
This post may contain affiliate links which means I make a commission if you shop through my links.
Disclosure Policy

What do you think of when you hear the phrase “go paperless” or “paperless office”? In theory, it should mean an organized workspace without paper where everything is stored online and easily accessible.
But, in practice, a lot of people think of it as a failed concept, as in:“Oh yeah, we’re supposed to be going paperless – but we have more paper than we’ve ever had before“. But maybe these people have such a negative view because they are not doing it right.
Going paperless is not just about scanning a bunch of paper and stashing it on your hard drive. Rather, it is about:
- creating a reliable digital system for finding your stuff
- using the right equipment for scanning and storing
- disposing of your paper properly
- and hanging onto the paper that you really need.
So you see – going paperless doesn’t mean that you need to ditch all your paper. You just need to be more intentional with what you have.
What Does Go Paperless Mean?
The formal definition of Going Paperless is this: Creating an environment where the use of paper documents is eliminated or reduced.
To make it happen, you convert your paper documents into a digital format (and throw away or shred the papers that you really don’t need).
Notice that the definition says “eliminated or reduced.” Going paperless is not an all-or-nothing concept. Think of it more like a spectrum. Where you land on it depends on your comfort level, your industry, and how much time you’re willing to invest up front.
Why Most Paperless Attempts Fail
Before we get into the steps, I want to talk a little bit about why so many people give up on going paperless somewhere along the path.
Usually, it comes down to one of these three things:
- They don’t have a system for finding files later. Scanning is the easy part. But, if you can’t find the digital version of your document six months from now, you just moved the clutter from your desk to your hard drive and that can be frustrating.
- Not trusting the digital copy. If you scan something but keep the paper “just in case,” you now have double the clutter, not less.
- Trying to do everything at once. Going paperless with 15 years of accumulated documents in one weekend is a recipe for disaster. Taking your home office paperless is a project in and of itself. You have a greater chance at success if you treat it that way. Set up some goals using the S.M.A.R.T. framework and take the time to track your goal progress.
Keeping these three pitfalls in mind will make the rest of this guide much more effective.
Open Your Mind to The Digital Mindset
Before you even get to the mechanics of going paperless, try and come to terms with the digital mindset. A good place to start is with my Complete Guide to Digital Organization. In this post, I outline the basics of how to improve your personal productivity by keeping your digital world organized.
If you are not truly ready to ditch the paper completely, that’s ok. But you have to be open to reducing the paper in your life and storing it in a digital format. This means that you need to take the first step and find digital storage that you are comfortable with and that you can trust.
Choose a Central Location for Your Digital Files
This storage could be Dropbox, Google Drive, iCloud Drive, Microsoft OneDrive, a home based cloud drive like the Synology NAS server, or even the hard drive on your computer. (And make sure to make regular back ups!)
If you don’t trust your system, you will end up creating a digital file but you will also hang onto the piece of paper – and that defeats the purpose of going paperless. So now, not only will you have paper clutter, you will also have digital clutter.
Whichever digital platform you choose, the most important thing is to make sure you trust your system.
Here is a quick way to think about the differences:
- Cloud storage (Dropbox, Google Drive, OneDrive, iCloud) – This option is the easiest to set up, it is accessible from any device, and someone else (i.e. Google, Microsoft, etc.) handles the hardware. This can be a good choice for most home offices and is the one that I use.
- Home server (like a Synology NAS) – This option involves more setup and a bigger upfront cost. But you control your own data and aren’t paying a monthly subscription forever. This can be a good choice if you have a lot of files or don’t want to rely on a third party but you will need a plan in place to backup your data.
- Local hard drive only – This is the option of storing your files on the internal hard drive of your computer or an external drive and might be the cheapest option. But it is risky because a single hard drive failure could wipe out everything. You really need to have a backup plan in place if you choose this.
Gather a Few Necessary Tools
In addition to a trustworthy storage destination for your digital files, you will need a bit of equipment to make going paperless easier:
- a reliable backup solution
- a plan to organize your digital files so you can find them when you need them
- a high speed scanner – personally, I like this Fujitsu ScanSnap (I use the predecessor – the iX1500 and it has saved me so much time!)
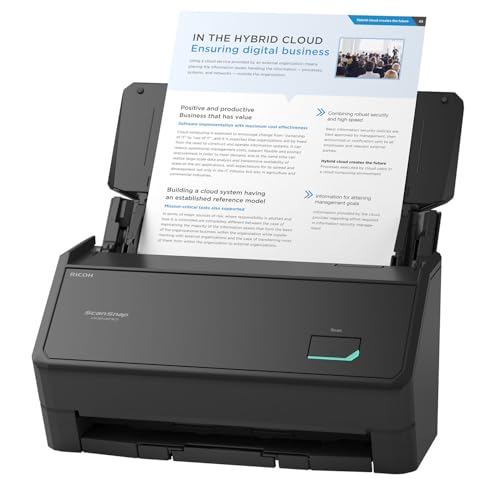
The Fujitsu ScanSnap is a a high speed wireless or USB scanner that can scan both sides of your paper at once. Use it to scan documents, receipts, and even photographs.
Just a note – you can always use the flatbed scanner that is part of your all in one printer, but scanning on this will be slow and tedious. If you truly want to go paperless then you will appreciate a fast scanner.
Now it is time to get started!
Step 1: Assess your comfort level
Remember, you don’t have to go completely paperless all at once. Let’s say you think going paperless is a good idea, but you are a bit skeptical – do a test run on a small aspect of your life.
For example, you could start with one area of concentration. In a home office – it could be a particular type of bill or a specific bank account, or even kids artwork – etc. Select a category of paper or even a single file folder from your home filing cabinet, and get started.
This “small win” approach has the secondary benefit of giving you the time and the practice you might need to trust your system enough to expand it.
Step 2: Choose your scanning equipment.
Usually, this consists of :
- a newish computer,
- a fast sheetfed scanner that can scan two sides of a sheet of paper at once – like the ScanSnap iX1600
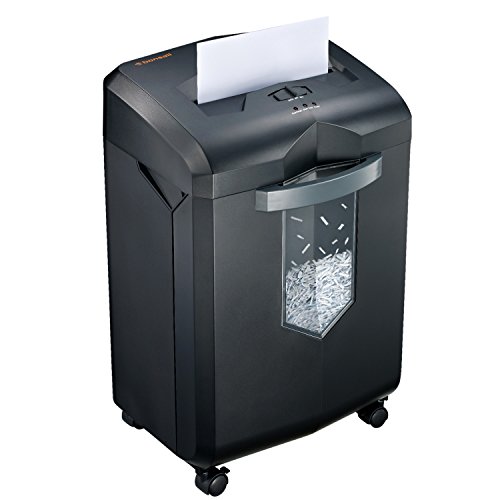
- and a powerful paper shredder (don’t be tempted by the inexpensive ones with low capacity because they overheat and will slow you down)
You can find a few different options in home office paper shredders here.
I know that a good scanner is a big investment. But if you are serious about going paperless – it is a necessary purchase.
The software that you use is also important at this stage. Generally, if you just plan to scan to your home computer, then the software that comes with the ScanSnap will be perfect. But make sure that your operating system is up to date and works with ScanSnap.
Step 3: Pick your storage.
You will need to decide whether you want to store your scans on a hard drive or server in your office or “in the cloud”.
Test out your choice of storage by uploading some files and learning the ropes.
Step 4: Create a disaster proof back up system.
A paperless system is only as good as its backup.
If you decide you are going paperless with important files – then you will need to make sure that they survive should disaster strike.
This usually means having at least two backups – one at home (like Apple Time Machine) and one offsite in the cloud (using a service like BackBlaze).
Think of it as the 3-2-1 rule: at least 3 copies of your data, on 2 different types of storage, with 1 copy stored somewhere off-site. It might sound like overkill until the day your laptop is stolen or your hard drive fails, and then you will be happy you took the time to do it.
Step 5: Organize your digital files.
Even if you have a plan for where to store your digital files you need to have a plan for where they end up on your storage drive and how to name them so you can find them.
Many people say – “I scan the paper but I don’t know where it goes.” That’s a problem. Don’t just guess at it, become familiar with each step of how your data is handled.
A simple, consistent naming convention for your digital files goes a long way. Something like YYYY-MM-DD_Category_Description (for example, 2026-07-09_Taxes_W2-Form) means your files will always sort chronologically and stay searchable, even a decade from now.
Step 6: Document your workflow.
Whether you are a one-person home office or a large company – you need to write down a workflow for how a piece of paper travels through your process..
Once that paper comes in the door
- where does it go?
- who handles it?
- who scans it?
- how often does scanning happen?
- once it’s on the computer – how does it get named and filed?
- what will happen to that piece of paper once it is processed?
I know that writing this down feels unnecessary especially when you might be the only one using the system, but you would be surprised how easy it is to forget what rules you put in place from one work session to the next. Good documentation is also essential if anyone else in your household or business ever needs to pick up where you left off.
Step 7: Securely shred the paper that you don’t need
Remember that the whole point of going paperless is to get rid of the paper that you scan so it doesn’t clutter up your home. So, once you are certain that your documents are safely stored online – make sure to deal with the actual physical piece of paper.
For most everyday items like receipts and bills you will likely securely shred the paper. But for more important documents – like car titles and other official items – you will need to hang onto the originals. So be aware!
Step 8: Special Considerations
Some industries have strict rules about having an original document. This means that a scanned copy is not enough. Think about documents like titles, birth certificates, social security cards etc. – these are things you should not get rid of.
There are also situations that may require you to have original documents as well. If you are involved in any legal proceedings you may need original documents for those. Whenever you have these special circumstances you should consult with the proper regulating agencies or counsel.
If in doubt – hold onto the original until you are sure you won’t need it.
Learning About Digital File Types
When you are storing different types of documents – papers, photographs, spreadsheets etc. – you will be faced with decisions as to what format you want to use to store those files.
This article explains the more common digital file types so you can choose the right one for the item you are saving.
Common Paperless Mistakes to Avoid
Here are a few mistakes that I see people run into once they start this process:
- Scanning everything as an image (JPG) file instead of a searchable PDF. This makes it much harder to search your files later by keyword.
- Skipping a consistent file-naming system. Leaving your files with generic names like scan001.pdf, scan002.pdf, and will make things hard to find. Eventually your data will become disorganized.
- Not having a solid backup plan. If it is important, make sure you have a reliable copy.
- Never actually shredding the paper. If the goal is less paper clutter, then you have to get rid of the paper once it’s safely digitized and you are sure you no longer need it.
- Trying to reorganize your entire filing cabinet in one sitting. Break it into smaller sessions so you don’t burn out and document your progress so you can pick up easily where you left off.
How to Maintain Your Paperless System Long-Term
Even though a paperless system is designed to make your life easier, you still need to invest time on a regular basis to keep it up and running. I know that I personally tend to put off doing these tasks, because it can be a little boring.
Here are a few habits that help me curb the procrastination:
- Set a regular scanning day. Whether it’s weekly or monthly, make an appointment with yourself to process incoming mail and paperwork. Dealing with it regularly keeps it from piling up again.
- Revisit your folder structure occasionally. As your life changes, your filing categories should too.
- Keep your backup running automatically. Don’t rely on remembering to back things up manually. It is best if you can set it and forget it.
- Do a periodic digital declutter. Just like paper can clutter up your desk, digital files can clutter your computer. Every so often, go through and delete or archive what you no longer need.
- Take time to organize the actual papers that you decide to keep. A paperless system is actually a blend of digital and paper files. In this post we have mostly talked about organizing your digital files, but you can use the ideas found here to keep your paperwork organized too.
Did you Go Paperless in Your Home Office?
As you can see, the process of going paperless does not have to be intimidating.
Once you have your set up – scanner, paper shredder, and online tools – it is really easy to get into the paperless habit.
And, if you are hesitant, start with a small project. Work with papers that are not important, but nice to have. The more you work with your system, the more comfortable you will get.



Hi Neena,
I am pro paperless. At work I have 2 screens to avoid printing especially when working with spreadsheets. I find this as my own way of contributing to the environment.
Thanks for sharing.
Jo
Hi Jo,
So much of what we print is not essential.
It’s great that you are conscious of this – it is good for the environment, but it probably also keeps your office clutter free.
Thanks for commenting!